How to set up a raspberry for lit3rick
Setting up the development tools
First, install the required tools to communicate with the board.
sudo apt-get update
sudo apt-get install i2c-tools libasound2-dev git python3-pip python3-dev libatlas-base-dev python3-all-dev libopenjp2-7-dev libtiff5
Then, one will need to enable i2c, i2s and spi through the raspberry raspi-config tool (tuto for SPI is here).
i2s can be enabled via sudo vi /boot/config.txt and uncommenting dtparam=i2s=on.
Then update python modules with the following command
pip3 install smbus2 RPi.GPIO PyAudio matplotlib
To get the tools for this board, the lit3rick repo can be used with all required tools at:
cd ~
git clone https://github.com/kelu124/lit3rick.git
cd lit3rick/program/utilities
make
sudo cp lit3prog /bin/
To test that the install is succesful, ./ram_test.sh would program the RGB led blinky on the fpga ram. The other script ./flash_test.sh writes a the bitstream on the flash, allowing for a persisting install (even across powerups).
Programming the correct firmware
Going back a level, one can flash the lit3rick with the lit3_v2.0.bin bitstream, with:
cd ../
./prog_ram.sh
(./prog_flash.sh writes a persisting version on the flash) `
Flashing the .. flash
When programming the flash, you should get the flash ID appear and the flashing starts. Takes a bit more time than the ram programming.

In case of issues
RPi4 seems to face flash issues, so please follow instructions here to update your Pi ( http://wiringpi.com/wiringpi-updated-to-2-52-for-the-raspberry-pi-4b/) to get the latest WiringPi:
cd /tmp
wget https://project-downloads.drogon.net/wiringpi-latest.deb
sudo dpkg -i wiringpi-latest.deb
Testing with an acquisition.
Make sure that the board is connected to a sensor, and that pulser voltages are connected, by default by putting jumpers on the 2 2x1 headers close to the SMAs.
cd ../py_fpga/
./ndt.py
This command should start the acquisition of a line, and will create the ndt* images and files.
To go forward programming
Any python editor works, but for the sake of simplicity I use VSCode on raspberrypi4 - this IDE allows you to work on a “working” computer while connected to raspberrypi. A great tutorial is here. It also allows multiple collaborators to access the code without having to be physically near the raspberry.
High voltage supply
One can remove the traditional jumpers supplying 5V to the positive HV path to pulser, to provide one’s HV.
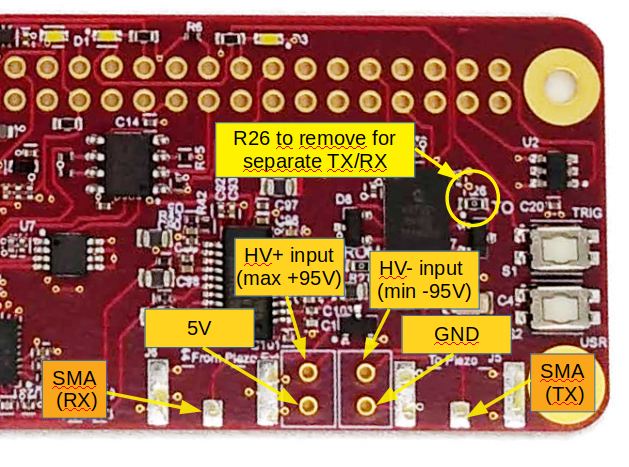
In case one wishes to use a dual element transducer, to separate tx and rx path, one needs to remove R26.